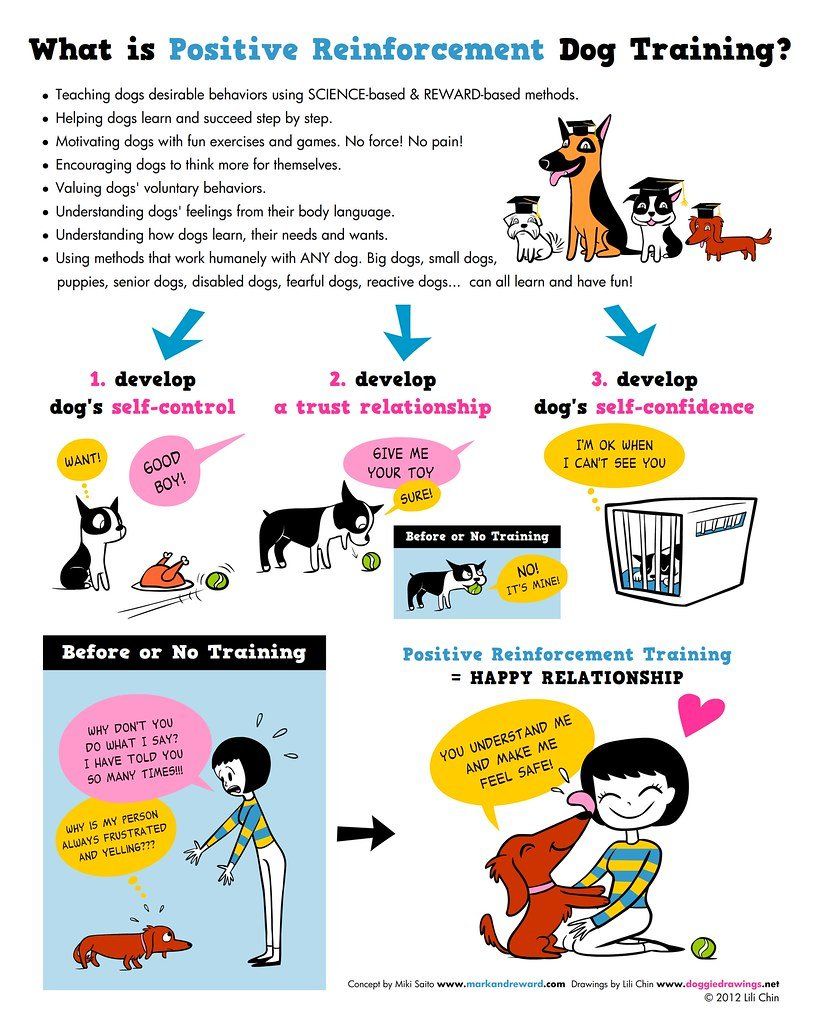
Training Tips
Sometimes everyone needs a little bit of help.
- Hold a reward treat in your hand and kneel in front of your dog.
- Put the treat to your pet's nose.
- Lift your hand upward.
- Tell your dog to sit.
- If your dog lifts its head to bite the food, use your other hand to guide his backside down into a sitting position.
- As it sits down, say, "sit."
- When your pet follows the command, praise it.
- Collar and leash your dog.
- Place your dos in a sitting position
- Hold the leash in your left hand.
- Put a squeaky toy in your right hand above the dog's head.
- Start walking with the toy in front while saying "heel".
- Get your pet's attention by squeaking the toy.
- If it gets distracted or pulls in front, stop walking immediately.
- When it pays attention again, praise your pet and give them the toy.
- Once your dog gives you 30 seconds of attention, begin walking again.
- Increase times before you reward your pet.
- Get a nice smelling treat and hold it in your closed hand.
- Place your hand up to your dog's nose and allow it to sniff the treat.
- As your pet smells it, move your hand to the floor.
- Allow your pet to follow it.
- After your dog is in the prone position, say "down".
- Give your dog the treat and praise it.
- Command your dog to sit.
- Open your palm and put it in front of you.
- Say, "stay".
- Step Backwards.
- If your dog stays put, give him the reward and praise.
- Increase the number of steps you take each time.
Housetraining
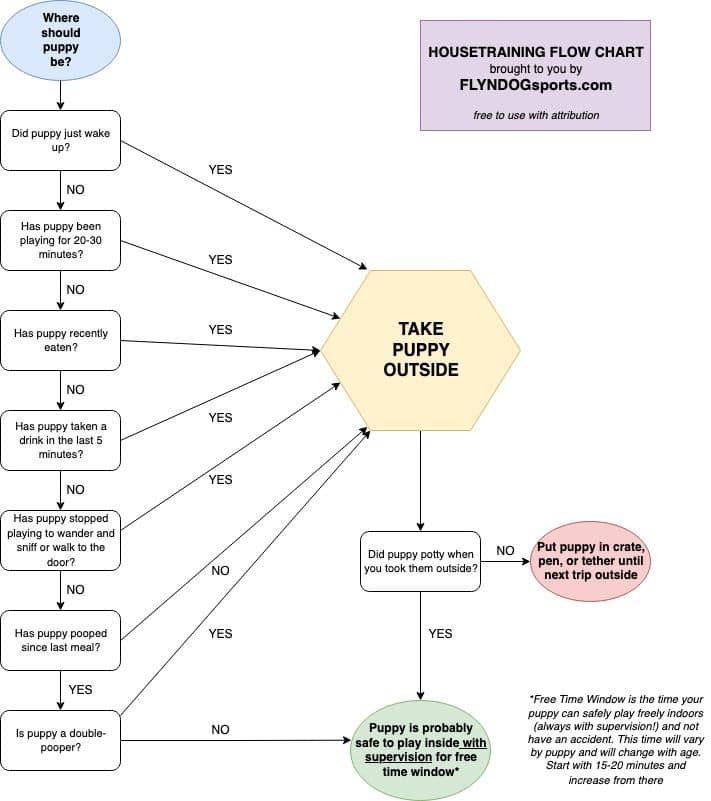
Let's break it down for you
The green and red ovals are the most important part of this graphic. Read those first!
- Lack of supervision is the most common cause of housetraining failure.
- Supervision means watching your dog like a hawk. Like a toddler with a metal fork and outlet access.
- When you can't be supervising, your dog should be placed in a situation that prevents potty accidents. This can be a crate, tethered to you, in a pen, or whatever works.
- Every accident that is not prevented or interrupted will make housetraining take longer.
- Follow the dog's natural cycle - their biology will create times when they will want to go and should be taken out regardless of an indicator-this is on the left hand of the above graphic.
- We don't recommend using potty pads - having places where it's OKAY to potty indoors is confusing and will make housetraining take longer.
- Potty breaks should be short; no more than 2-3 minutes. If the breaks take too long, the dog gets bored and can forget what they're out there to do. Long potty breaks will also teach your dog to hold it in while outside, giving them a nice, long amount of outside time to sniff and explore.
- Potty breaks should be frequent if your situation allows it.
- Potty breaks should be on a leash and supervised. No backyard exploring.
- Watch for pre-potty routines - this could be sniffing, circling or restless behaviour.
- Never punish a housetraining accident - especially if you didn't catch your dog in the act. This will teach your dog to sneak off to another room or wait to go when you're not paying attention.
- Leave a leash on your dog while indoors so you can gently interrupt an accident and take your dog outside.
- Heavily reward and praise any outside potty. We suggest high value treats - such as cheese.
- Put the act of going potty on a cue - pick whatever word you're comfortable with and say it right before taking your dog outside.
- Dogs do not generalize housetraining - this means they can be perfect in your home, but not realize housetraining means not pottying anywhere indoors.
Note: Punishing any poor behaviour after the fact does not teach the dog not to do this behaviour. They can't make those time-delayed associations between action and consequence. All this will do is confuse your dog and harm your relationship.


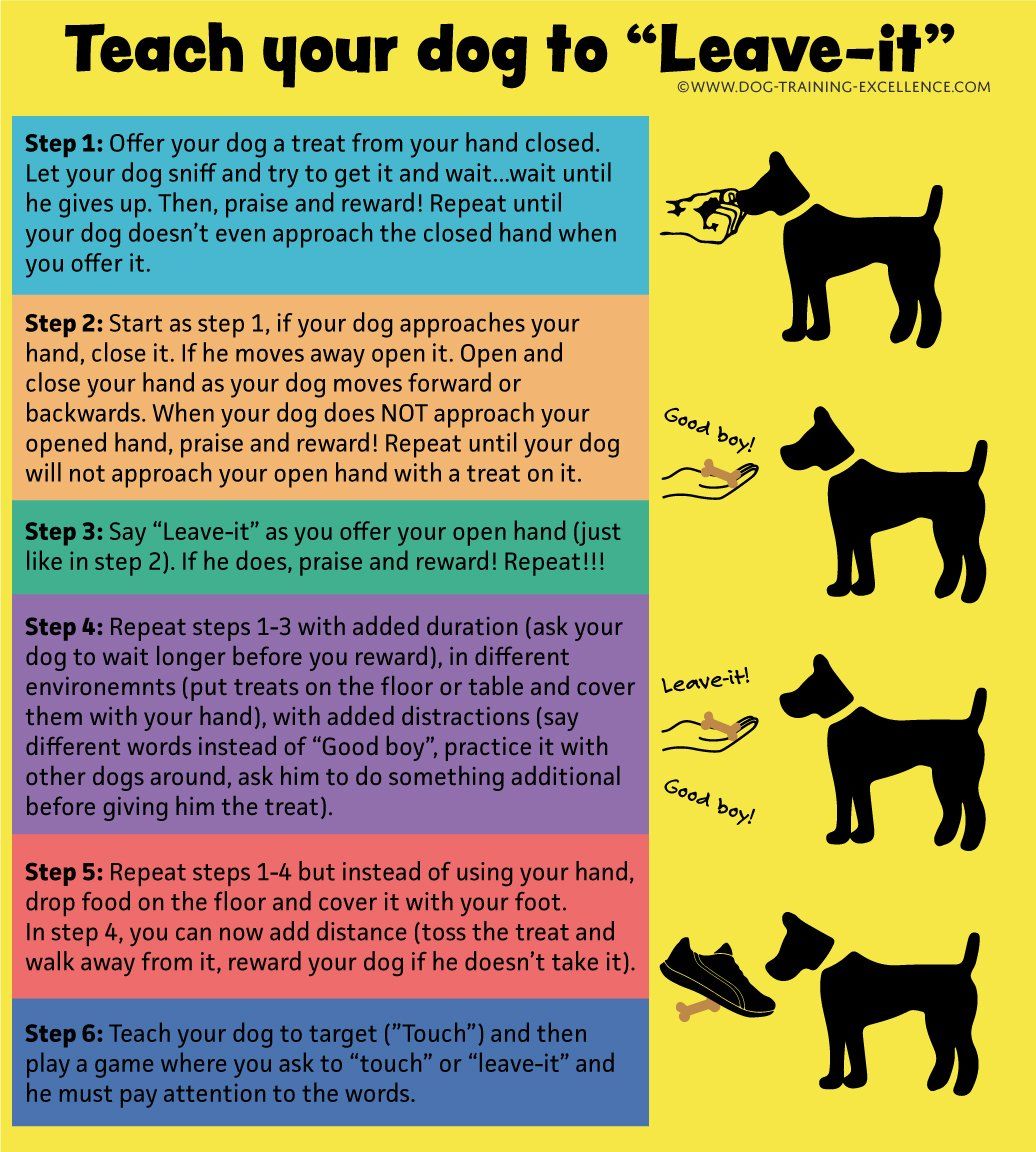
The "Leave It" Command
Imagine you've dropped a chicken bone on the ground at dinner time. Or perhaps you've spilled some medication. The last thing you want is for your dog to go running towards these perceived treats and scarfing them down. Cooked bones are a choking hazard and the pills could be toxic. Making sure your dog understands that everything on the ground isn't up for grabs could be potentially life-saving. But, how do you teach your dog to leave things be? The "leave it" command is the cue you'll need.
STRAY TO PLAY Toronto, Ontario Canada info@straytoplay.org
Stray to Play is a registered charity dedicated to rescuing dogs from all over the globe and finding them loving, lasting homes. We do this by working with volunteers, foster homes and veterinarians, and, of course, our rescue partners.
CRA Registration number: 737551333 RR 0001